How to divert only selected messages from Gmail into Sugester
Created:
2017-12-12
Last updated: 2017-12-13
Last updated: 2017-12-13
Post view count: 1976
If you wish to receive your clients emails which were sent to Gmail to Sugester, you can setup a redirect for your Gmail account. This will allow you to see all of your emails on both your Gmail account and in Sugester. If instead, you would only like a select few emails to be diverted from Gmail to Sugester, you will have to set up filters which will correctly filter incoming emails.
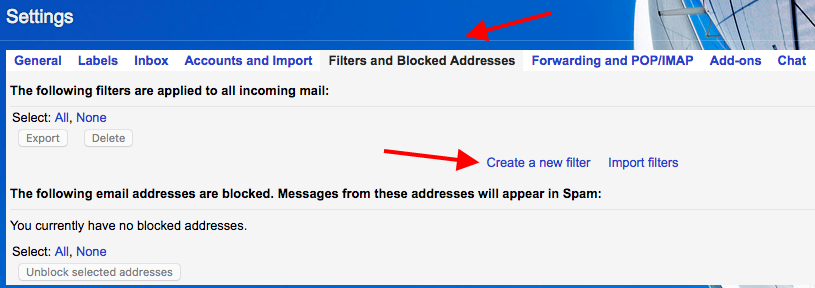
To enable these filters navigate to Settings > Filters and blocked addresses and click on Create new filter

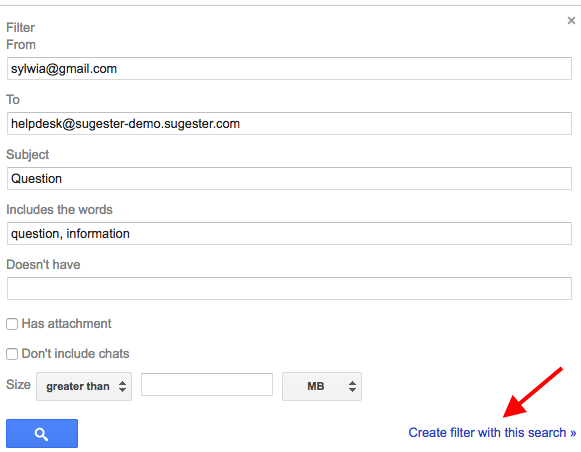
A new window will appear, in this window be sure to fill out all the appropriate fields, especially the email addresses, the subject, and the keywords. This will allow the system to precisely filter the emails which will end up in your Sugester inbox. Next we click the button Create Filter.

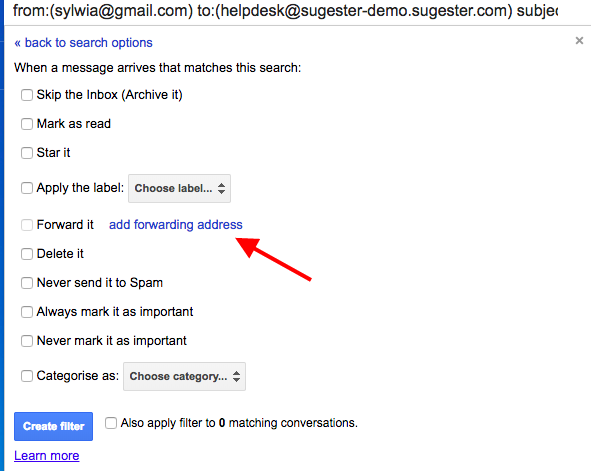
Next you will need to check the options: Redirect to and add the corresponding email address to which the redirect emails should be send.

A confirmation email will be send to your Sugester inbox which will contain a link to confirm the request to activate this functionality, next you will obtain a verification code. Navigate to Directing POP/IMAP and insert the code. Next mark the checkboxes ‘Redirect the copies of emails dispatched to’ and activate both ‘POP’ and ‘IMAP’. Save the changes and you are done.
To enable these filters navigate to Settings > Filters and blocked addresses and click on Create new filter

A new window will appear, in this window be sure to fill out all the appropriate fields, especially the email addresses, the subject, and the keywords. This will allow the system to precisely filter the emails which will end up in your Sugester inbox. Next we click the button Create Filter.

Next you will need to check the options: Redirect to and add the corresponding email address to which the redirect emails should be send.

A confirmation email will be send to your Sugester inbox which will contain a link to confirm the request to activate this functionality, next you will obtain a verification code. Navigate to Directing POP/IMAP and insert the code. Next mark the checkboxes ‘Redirect the copies of emails dispatched to’ and activate both ‘POP’ and ‘IMAP’. Save the changes and you are done.
Back

Add Comment