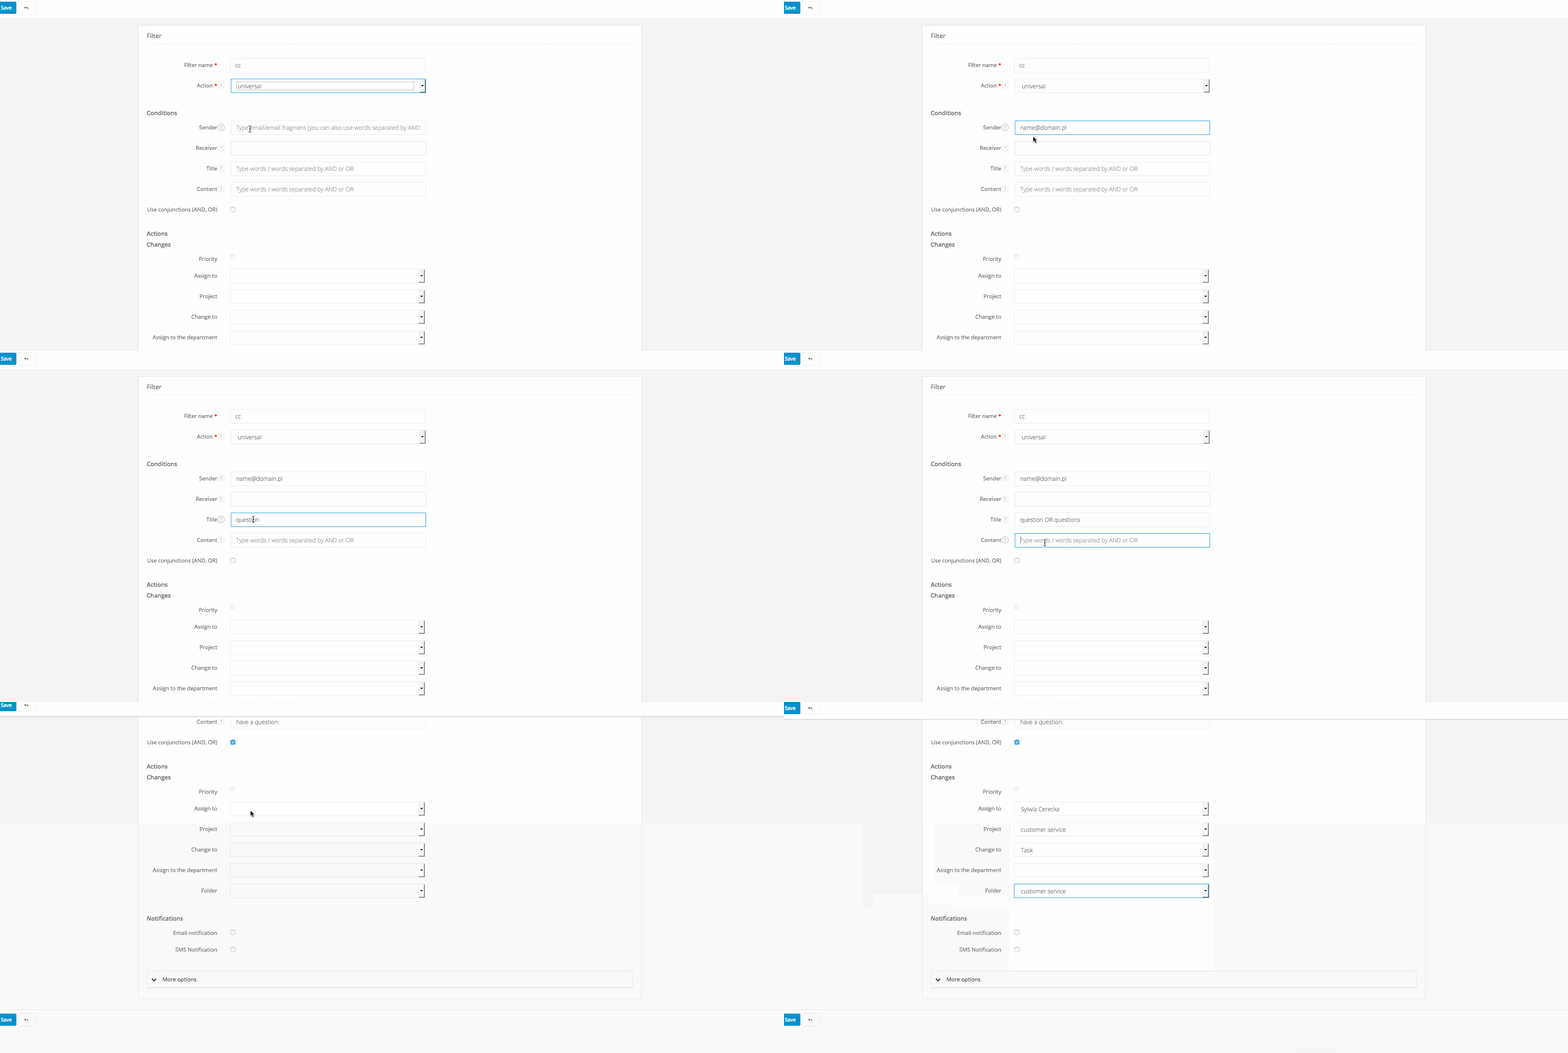
Filters - Assign to user; to folder; to project; to department. Change into an assignment
Created:
2017-12-12
Last updated: 2017-12-13
Last updated: 2017-12-13
Post view count: 2233
Sugester has the option of using a universal filter - this will enable you to redirect specific emails (or emails from specific domains) which are received to the appropriate personnel and/or project or folders.
1. Filter - Assign to user
* In the field Type set the filter type to - Universal
* Provide a name for the filter
* Fill out at least one of the following four fields: Sender, Receiver, Title and Subjects (the more fields are provided, the more detailed the filter will be)
* Go to More options and specify the priority of the filter - the higher the level of priority, the more important the filter is
In the field Assign to we select the user to whom the messages to which the filter has been applied should be redirect to.
2. Assign to an inbox folder
To redirect specific emails directly to a folder which you have recently created in your inbox, conduct the following steps:
* We create an inbox folder. To do this see Folders in your inbox
* We navigate to the menu Settings > Account Settings > Automation > Filters
* In the field Type set the filter type to - Universal
* Provide a name for the filter
* Fill out at least one of the following four fields: Sender, Receiver, Title and Subjects (the more fields are provided, the more detailed the filter will be)
* Specify the priority of the filter - the higher the level of priority, the more important the filter is
3. Assign simultaneously to a project and a user
To redirect specific emails directly to a user and for them to be visible in the appropriate project folder, conduct the following steps:
* Go the menu Settings > Account Settings > Automation > Filters
* In the field Type set the filter type to - Universal
* Provide a name for the filter
* Fill out at least one of the following four fields: Sender, Receiver, Title and Subjects (the more fields are provided, the more detailed the filter will be)
* Specify the priority of the filter - the higher the level of priority, the more important the filter is
* In the field Project select the project to which the filtered emails should be diverted.
In the field Assign to select the user.
4.Filter - Assign to a project
5. Filter - Change into a task
To redirect specific emails directly to a user and for them to be visible in the appropriate project folder, conduct the following steps:
* Go the menu Settings > Account Settings > Automation > Filters
* In the field Type set the filter type to - Universal
* Provide a name for the filter
* Fill out at least one of the following four fields: Sender, Receiver, Title and Subjects (the more fields are provided, the more detailed the filter will be).
* In the field Change to select Task. In the field Assign to select the user to whom the task should be assigned.
* Specify the priority of the filter - the higher the level of priority, the more important the filter is

When creating a filter you are only required to fill out one of the four required fields for the filter to work.
To create the filter you need to specify the Sender, Recipient, Title or Subjects of the email.
For accounts which have old filters enabled (separate filters for Assign to users and Assign to Project) and the new filter (Universal filter), the new filter will overwrite the older filters.
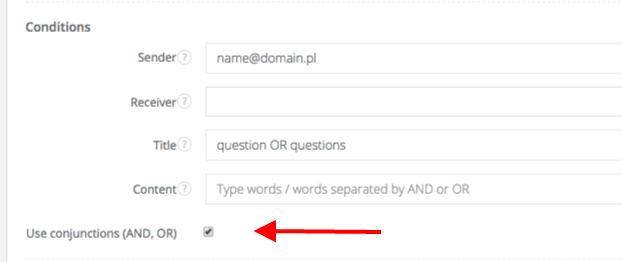
Note: we have added a new add-on for filters. From now on they also service the function OR/AND. If you want your filter to be more effective, uses these functionality when filling in the fields - Sender, Recipient, Title and Subject. The more fields you provide the more accurate the filter will be.
Remember when you use the rule ‘OR’ that for example: if you insert ‘yes’ OR ‘no’ in the the title the system will filter all emails, which contain the words ‘yes’ or ‘no’ in their title.
If however you choose to use ‘AND’ using the same example: if you insert ‘yes’ AND ‘no’ in the title the system will filter all emails which contain both ‘yes’ and ‘no’.
IMPORTANT: OR/AND should be entered in CAPITALS.

1. Filter - Assign to user
To redirect specific emails to a defined user, you have to conduct the following steps:
* Go the menu Settings > Account Settings > Automation > Filters* In the field Type set the filter type to - Universal
* Provide a name for the filter
* Fill out at least one of the following four fields: Sender, Receiver, Title and Subjects (the more fields are provided, the more detailed the filter will be)
* Go to More options and specify the priority of the filter - the higher the level of priority, the more important the filter is
In the field Assign to we select the user to whom the messages to which the filter has been applied should be redirect to.
2. Assign to an inbox folder
To redirect specific emails directly to a folder which you have recently created in your inbox, conduct the following steps:
* We create an inbox folder. To do this see Folders in your inbox
* We navigate to the menu Settings > Account Settings > Automation > Filters
* In the field Type set the filter type to - Universal
* Provide a name for the filter
* Fill out at least one of the following four fields: Sender, Receiver, Title and Subjects (the more fields are provided, the more detailed the filter will be)
* Specify the priority of the filter - the higher the level of priority, the more important the filter is
3. Assign simultaneously to a project and a user
To redirect specific emails directly to a user and for them to be visible in the appropriate project folder, conduct the following steps:
* Go the menu Settings > Account Settings > Automation > Filters
* In the field Type set the filter type to - Universal
* Provide a name for the filter
* Fill out at least one of the following four fields: Sender, Receiver, Title and Subjects (the more fields are provided, the more detailed the filter will be)
* Specify the priority of the filter - the higher the level of priority, the more important the filter is
* In the field Project select the project to which the filtered emails should be diverted.
In the field Assign to select the user.
4.Filter - Assign to a project
To redirect specific emails directly to the appropriate project folder, conduct the following steps:
* Go the menu Settings > Account Settings > Automation > Filters
* In the field Type set the filter type to - Universal
* Provide a name for the filter
* Fill out at least one of the following four fields: Sender, Receiver, Title and Subjects (the more fields are provided, the more detailed the filter will be)
* Specify the priority of the filter - the higher the level of priority, the more important the filter is
5. Filter - Change into a task
To redirect specific emails directly to a user and for them to be visible in the appropriate project folder, conduct the following steps:
* Go the menu Settings > Account Settings > Automation > Filters
* In the field Type set the filter type to - Universal
* Provide a name for the filter
* Fill out at least one of the following four fields: Sender, Receiver, Title and Subjects (the more fields are provided, the more detailed the filter will be).
* In the field Change to select Task. In the field Assign to select the user to whom the task should be assigned.
* Specify the priority of the filter - the higher the level of priority, the more important the filter is

When creating a filter you are only required to fill out one of the four required fields for the filter to work.
To create the filter you need to specify the Sender, Recipient, Title or Subjects of the email.
For accounts which have old filters enabled (separate filters for Assign to users and Assign to Project) and the new filter (Universal filter), the new filter will overwrite the older filters.
Note: we have added a new add-on for filters. From now on they also service the function OR/AND. If you want your filter to be more effective, uses these functionality when filling in the fields - Sender, Recipient, Title and Subject. The more fields you provide the more accurate the filter will be.
Remember when you use the rule ‘OR’ that for example: if you insert ‘yes’ OR ‘no’ in the the title the system will filter all emails, which contain the words ‘yes’ or ‘no’ in their title.
If however you choose to use ‘AND’ using the same example: if you insert ‘yes’ AND ‘no’ in the title the system will filter all emails which contain both ‘yes’ and ‘no’.
IMPORTANT: OR/AND should be entered in CAPITALS.

Back

Add Comment