How to configure privileges, in order to obtain an employee and a department manager
Created:
2018-04-23
Last updated: 2019-12-17
Last updated: 2019-12-17
Post view count: 2111
Every company, even a small one, has an organizational structure and it requires allocating the appropriate privileges to individual employees. We do not always want every single employee to have insights into all of the companies data. Ideally, assigning roles for each employee is the perfect solution.
Below you can find an example of assigning privileges to a Manager and a Salesman
1. In order to give the user the role of the Manager of the selected department (he sees the contacts of his salesmen - from a given department), the appropriate role should be created first. To do this, navigate to Settings > Users menu and click the Roles button in the upper right corner, and then + New role

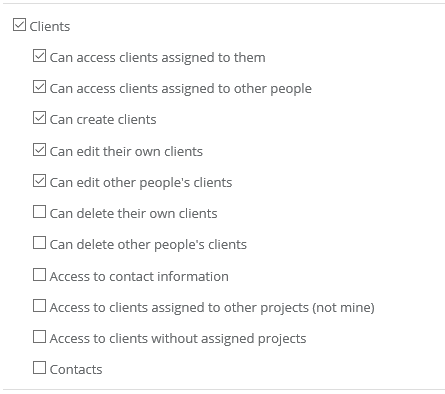
Properly name a given role, eg Department Manager, and then in the Clients section, mark the following options (or more, depending on your needs):

After having done this, navigate to Settings > Departments and add the appropriate department (eg Mazovia Department), which you can use to assign a Department Manager to.
Finally, go to Settings > Users menu and click Add User, fill in the data and select a department for the user (Mazovian Department), in which he will be the manager, and choose the role that we created the ‘Department Manager’.
2. To create the role of a salesman / department employee who will only see contacts that he has added, go again to the Settings > Users menu and click the Roles button in the upper right corner, then + New role

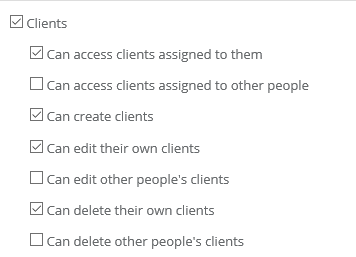
Name the given role, eg Salesman, and then tick the boxes below (or more):

Finally, go to the Settings > Users menu and create a new user and in the Privileges field, select the role you just created and the department to which the salesman should have access (Masovian Department).
Below you can find an example of assigning privileges to a Manager and a Salesman
1. In order to give the user the role of the Manager of the selected department (he sees the contacts of his salesmen - from a given department), the appropriate role should be created first. To do this, navigate to Settings > Users menu and click the Roles button in the upper right corner, and then + New role

Properly name a given role, eg Department Manager, and then in the Clients section, mark the following options (or more, depending on your needs):

After having done this, navigate to Settings > Departments and add the appropriate department (eg Mazovia Department), which you can use to assign a Department Manager to.
Finally, go to Settings > Users menu and click Add User, fill in the data and select a department for the user (Mazovian Department), in which he will be the manager, and choose the role that we created the ‘Department Manager’.
2. To create the role of a salesman / department employee who will only see contacts that he has added, go again to the Settings > Users menu and click the Roles button in the upper right corner, then + New role

Name the given role, eg Salesman, and then tick the boxes below (or more):

Finally, go to the Settings > Users menu and create a new user and in the Privileges field, select the role you just created and the department to which the salesman should have access (Masovian Department).
Back

Add Comment