In Sugester you can create forms and collect its data in the system. The content of a filled form can be automatically sent to your email address. This feature is especially useful when you're collecting service reports, questions for a customer support or just want to learn your clients' opinions.
To create a new form, first enable the right module. Select Settings > Modules and mark Forms.
After enabling the module you can start creating your custom forms. To do it, select Forms > Add > Create form.
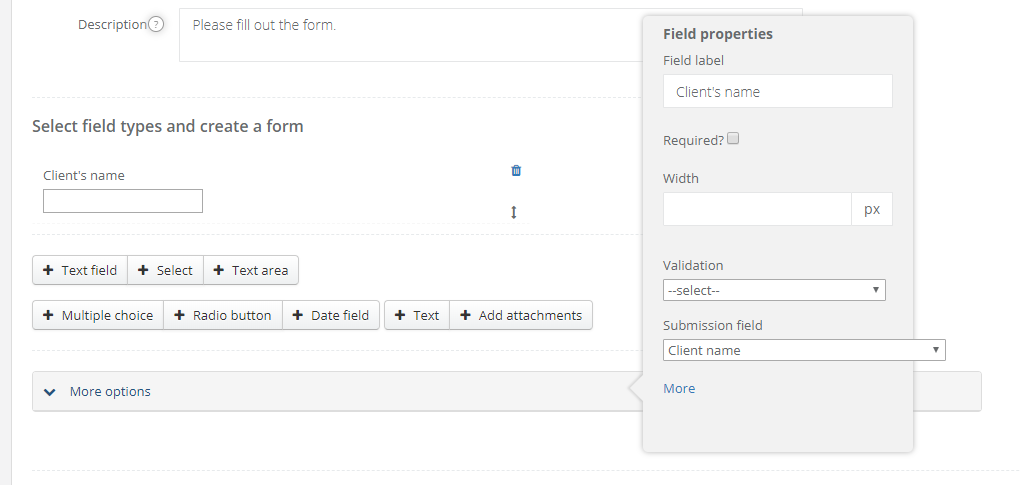
You will see this window:
To each form you can add as many fields as you want. You can find the description below:

| Add attachments | Enables users to add attachments to a form |
| Text field | A short text, like e-mail or name and last name |
| Select | Unfolding list with one option to choose |
| Text area | Longer text, eg description of a problem or user's comments |
| Multiple choice | A list with more than one option to mark |
| Radio button | A list with one option to mark |
| Date field | By clicking in it you can select a date from a calendar |
| Text | Enables to add a text to a form, like a description or introduction to another section |
Particular fields can have many properties, like a label, whether the field is required, width in px, validation kind (email, number etc.), submission field (eg. in a mapping kind client, more info later, you can decide if you want the data from the form to fill in fields in client's profile).
Note: if you want to create a new client out of form, you must add one 'Name' field.
Under More options button you have additional form's settings:
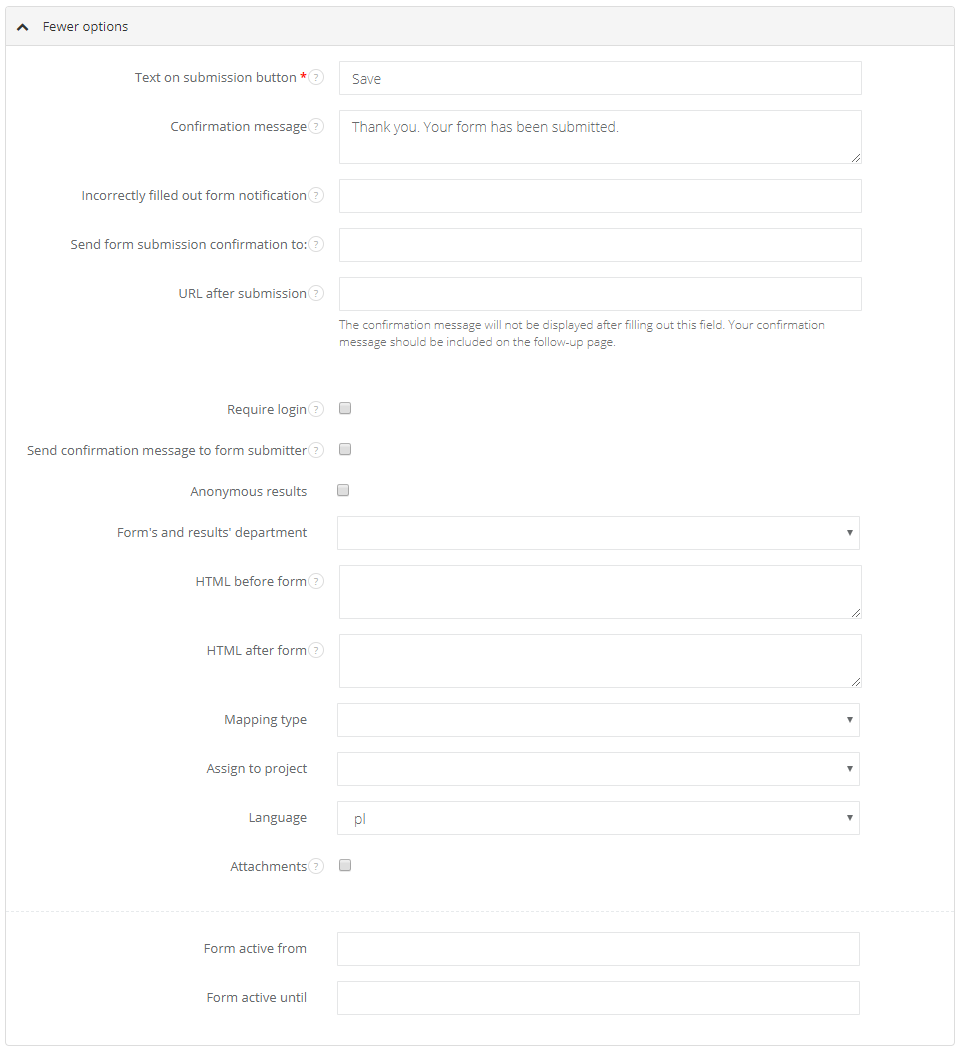
- Text on submission button - enter the text to be displayed on the form's 'submit' button
- Confirmation message - this message will be displayed to users upon successful submission of your form
- Incorrectly filled out form notification - users will see this message if they try to submit an incorrectly filled out form
- Send form submission confirmation to - an email notification will be sent to this address every time the form is filled out
- URL after submission - users will be sent to this URL after they've successfully submitted your form
- Require login - if you tick this box, users will be required to log in to your Sugester account before they are allowed to fill out this form
- Send confirmation message to form submitter - tick this box if you want users to receive an email notification (or a thank you message) after they've filled out your form
- Anonymous results - mark the box if you want form results to be displayed without IP, login, client, etc. Great feature if you want to create a survey among your employees
- Form's and results' department - select which department will have access to the form and its results
- HTML before form - HTML code from this field will be inserted before the form
- HTML after form - HTML from this field will be inserted after your form
- Mapping type - select if you want a form to be mapped to a task/client/email. Dependent on what you select, you will see:
- Mapping objects' department - select a department for a task created out of the form
b) Client:
- Sensitive data - mark if you want contact data, such as email and phone, to be hidden from users
- Force client's data update - mark if you want the new data to overwrite the old one from client's profile
- Mapping objects' department - select a department for a client created out of the form
c) Email:
- The mailbox in the system to which the message should be sent - select a mailbox from the list
- Assign to project - select a project to assign filled forms
- Language - select a language in which the survey will be sent
- Attachments - mark if you want users to be able to add attachments to their form submissions
- Form active from/until - select the period of time in which users can fill a form
<script src="https://code.jquery.com/jquery-latest.min.js" type="text/javascript"></script>